User Guide
Welcome to ConnectUS!
ConnectUS is the ultimate contact management system for your everyday needs. If you’re an NUS School of Computing (SoC) student, this app is for you. With ConnectUS, you can easily connect with people without the anxiety of remembering who you met where holding you back from socialising.
We’re focused on:
- Efficiency: Optimized for use via a Command Line Interface (CLI), you can easily view and edit your contacts at your fingertips with ConnectUS.
- User-friendliness: With the benefits of having a Graphical User Interface (GUI), easily navigate through your contact information to find exactly what you need to connect with others.
This User Guide will provide you with an in-depth documentation for you to easily integrate ConnectUS into your daily life. It covers step-by-step instructions on setting up ConnectUS, core ConnectUS features and commands, and a glossary for definitions of terms used in ConnectUS.
So what are you waiting for? Get ready to Connect with others and let US handle the rest!
Table of Contents
- 1. Using this guide
- 2. Installation
- 3. Quick Start Guide
-
4. Features
- 4.1 Viewing help:
help - 4.2 Listing all contacts:
list - 4.3 Clearing all entries:
clear - 4.4 Adding a contact:
add - 4.5 Editing a contact:
edit - 4.6 Adding additional tags to a contact:
add-t - 4.7 Deleting tags from a contact:
delete-t - 4.8 Deleting a contact:
delete - 4.9 Searching for contact information:
search - 4.10 Opening a social media platform:
open - 4.11 Opening a social media platform with prefilled message:
chat - 4.12 View upcoming birthdays:
upcoming-b - 4.13 Exiting the program:
exit - 4.14 Saving the data
- 4.15 Editing the data file
- 4.1 Viewing help:
- 5. Information Fields & Prefixes
- 6. FAQ
- 7. Command Summary
- 8. Prefix Summary
- 9. Glossary
1. Using this guide
Thank you for choosing ConnectUS! We are delighted to have you onboard with us as a user.
We highly recommend that you read through our User Guide in a sequential order.
1.1 Notation
Some special notations are used throughout this guide:
- Links in blue will help you navigate through this document, or take you to places on the Internet.
- Bolded words are phrases that you should pay attention to.
- Underlined words can be found in the Glossary.
1.2 Navigation
-
If this is your first time using ConnectUS, head over to our Installation guide for instructions on setting up ConnectUS, and our Quick Start Guide to begin using ConnectUS.
-
If you need a refresher on command syntax, head over to Command Summary for a reference table of commands, or Prefix Summary for a reference table of prefixes.
-
For detailed instructions about the features we offer and how to use each command, please refer to Features.
-
For detailed information about the different information fields that you can assign to a contact, please refer to Information Fields & Prefixes.
-
Refer to the Glossary for definitions of terms used in ConnectUS.
2. Installation
ConnectUS works on any mainstream OS as long as Java 11 installed.
If you have yet to install ConnectUS, simply follow these steps to set it up:
Step 1: Ensure you have Java 11(found here) installed in your computer.
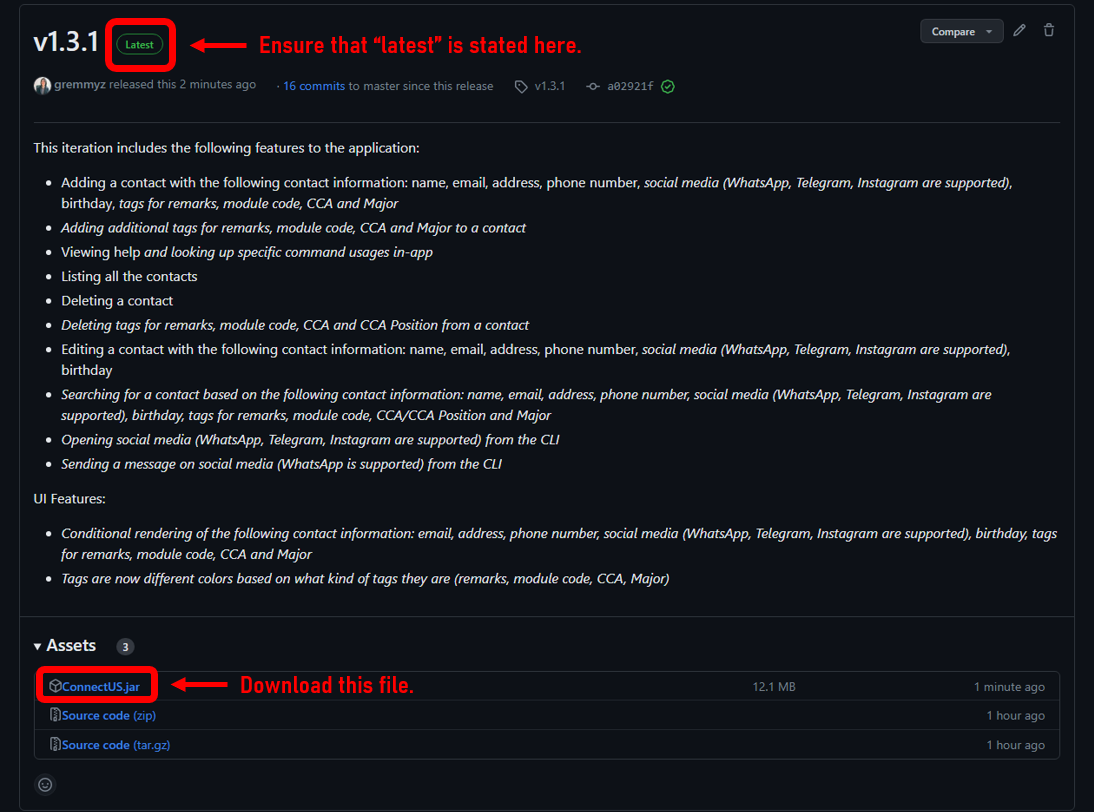
Step 2: Download the latest ConnectUS.jar from our releases page on GitHub.
Step 3: Copy the file to the folder you want to use as the home folder for your ConnectUS app.
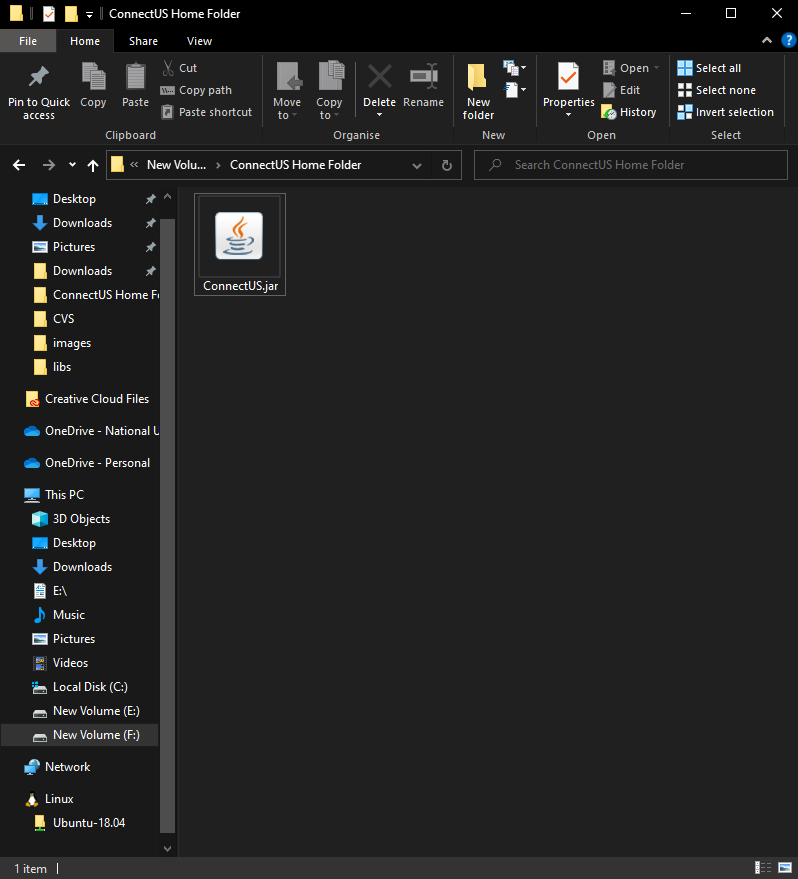
Step 4: Double-click the ConnectUS.jar file to start the app.
A GUI similar to the below should appear in a few seconds. Note how the app contains some sample data.
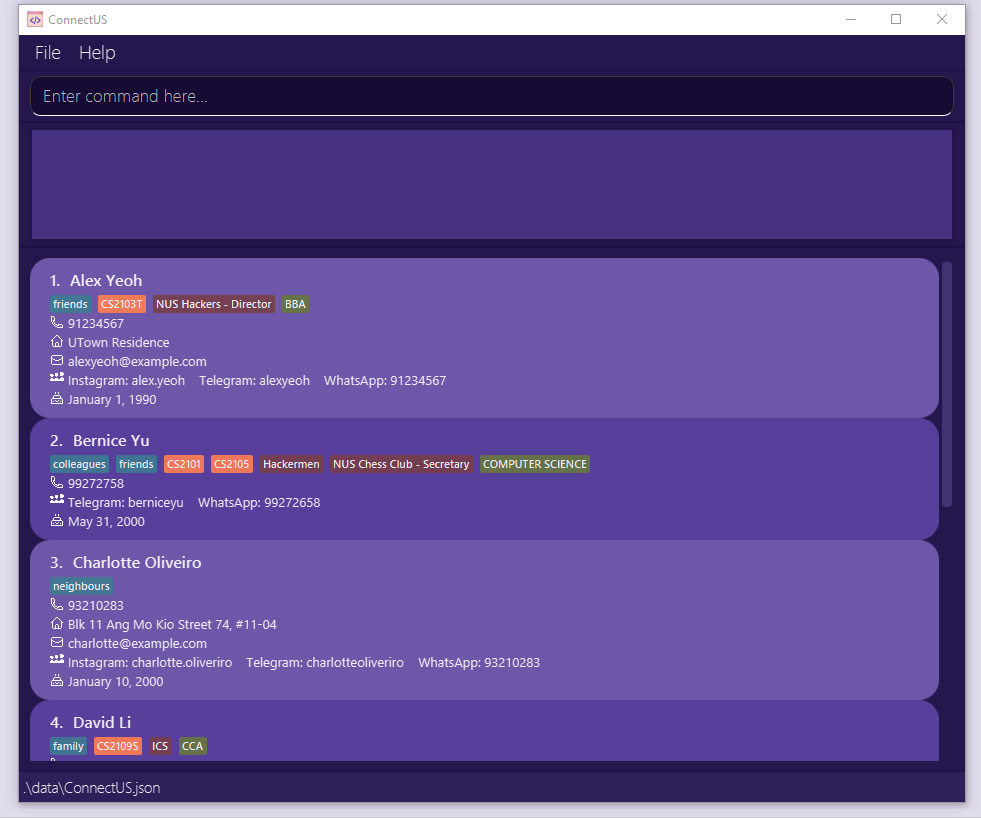
Congratulations! You have successfully set up ConnectUS.
3. Quick Start Guide
3.1 Layout
Let’s take a look at the different components in ConnectUS.
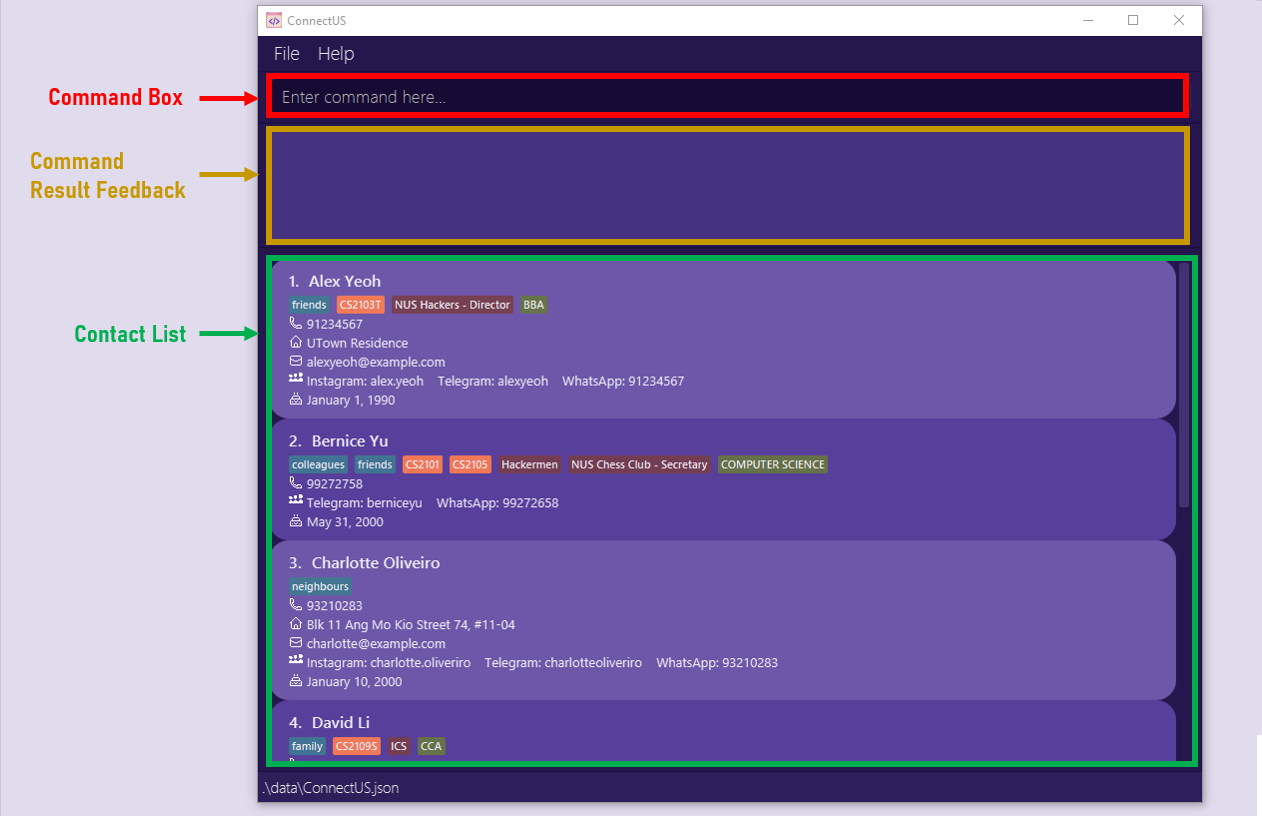
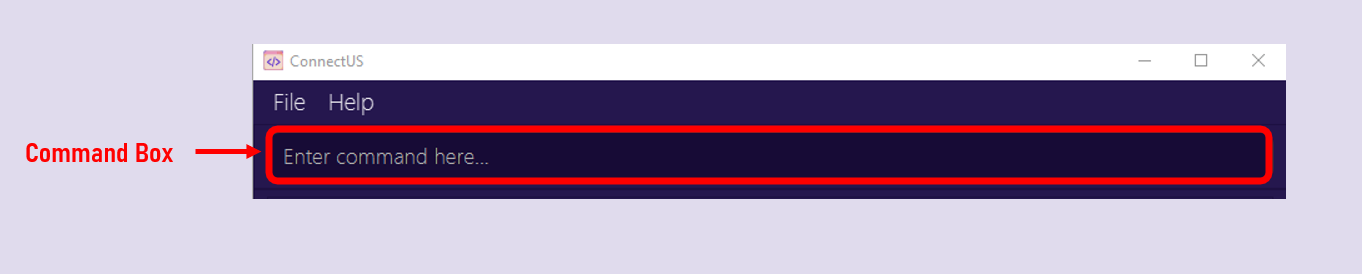
3.1.1 Command Box

The command box allows you to enter commands that you wish to perform. For starters, try typing the help command and hit enter!
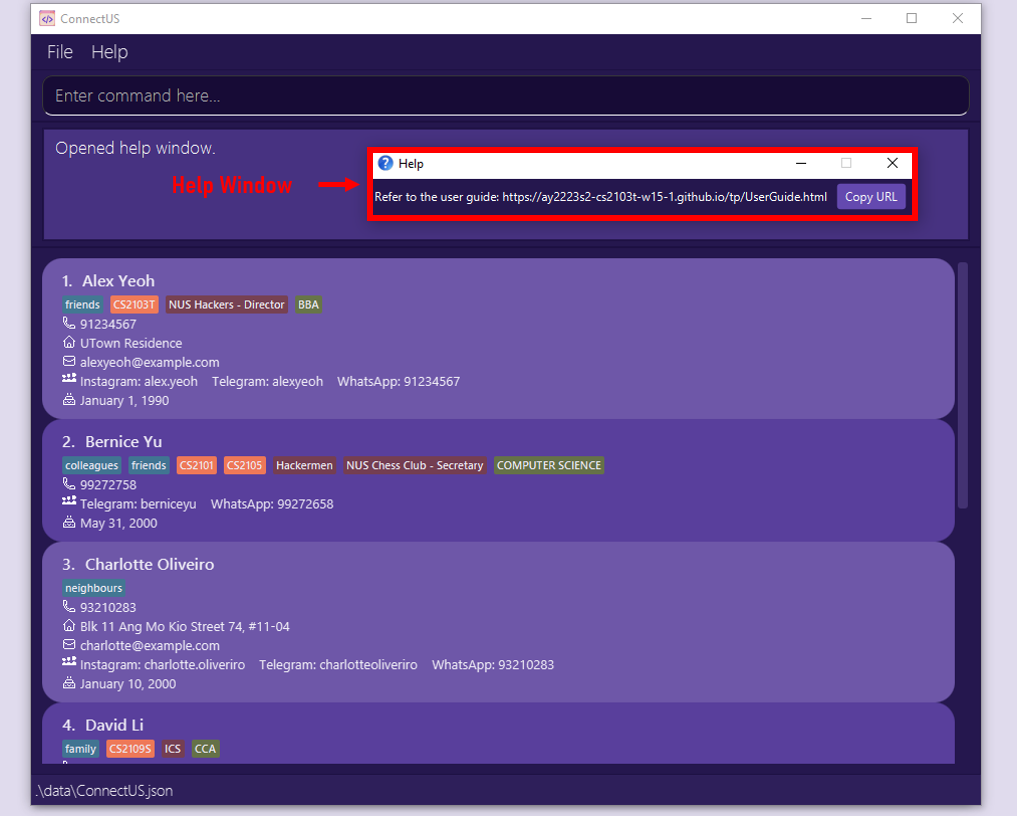
3.1.2 Command Result Feedback

The command result feedback box will provide you with a feedback message after a command is entered. For example, after typing help, you should see the above feedback in your ConnectUS application, along with a new Help Window!
If you enter an unrecognized command or a command with the wrong format, an error message will be shown in this feedback box:
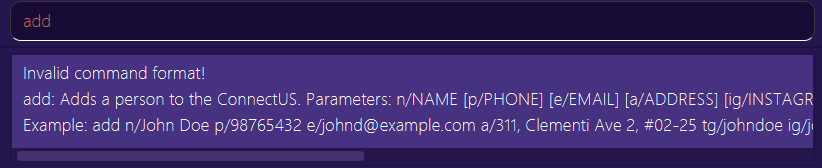
You can then use the scroll bars of the feedback box to navigate through the feedback given.
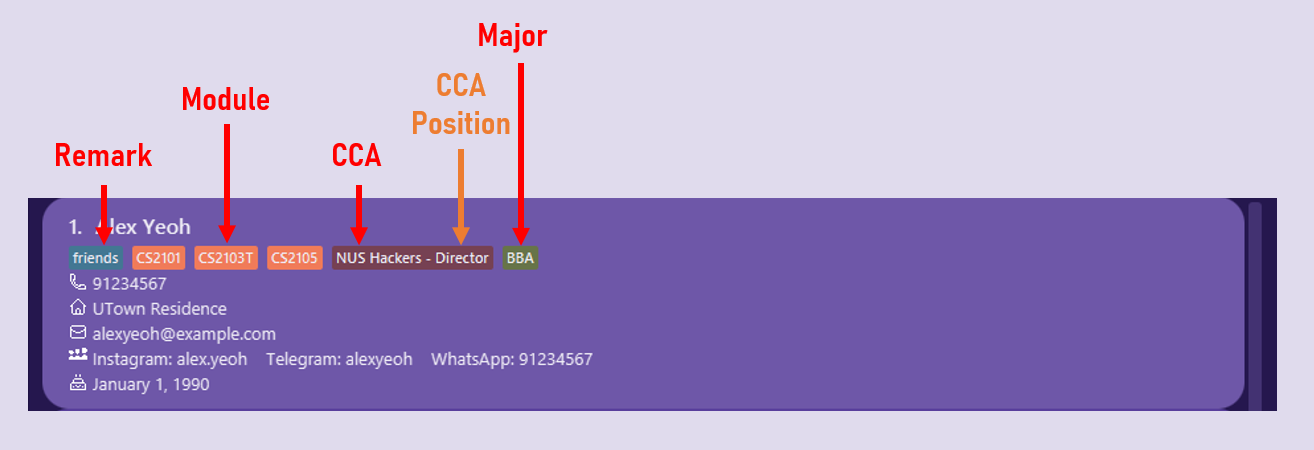
3.1.3 Contact List
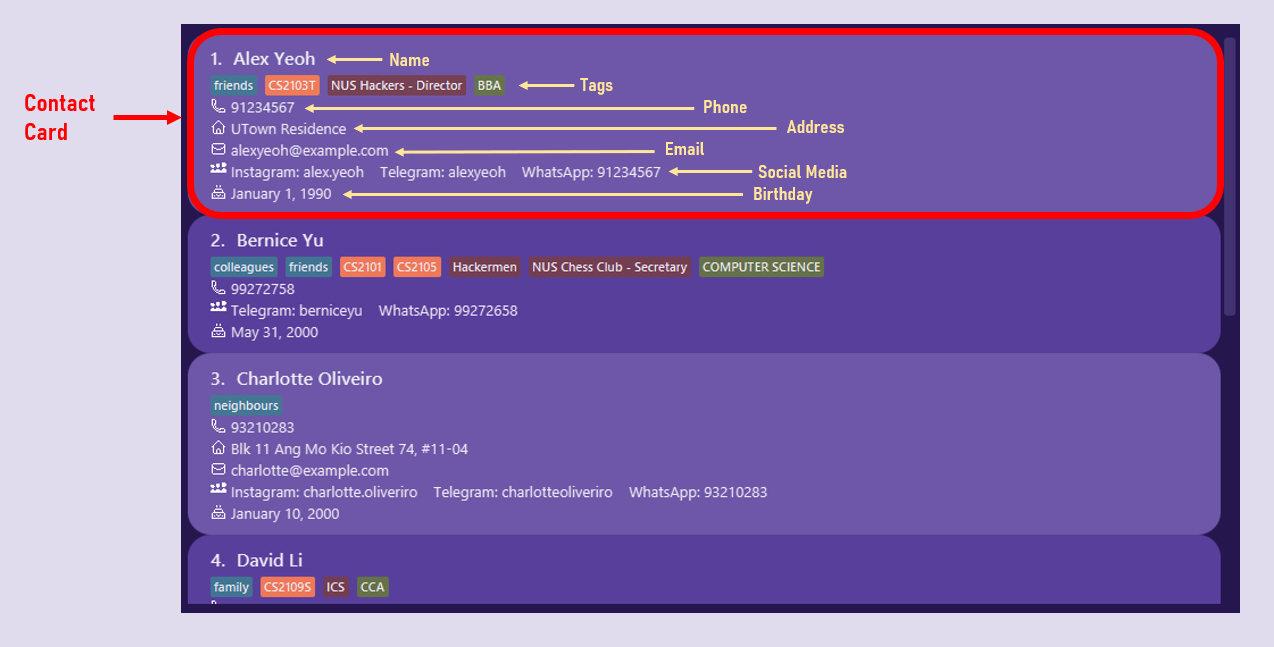
The contact list shows the contacts that exist within your ConnectUS with all their registered information fields.
- There is a scroll bar beside the contact list container for you to scroll through your contact list.
- The index beside the contact name is the contact’s index. It is used for certain commands such as
delete. More details on this can be found in Features. - The list of information fields and their details can be found in Information Fields & Prefixes.
- You can also find a condensed summary table of these information fields in the Prefix Summary.
3.2 Key Definitions
3.2.1 Command
Commands are actions that you want to perform using ConnectUS. Most commands will require user inputs, otherwise known as parameters, for ConnectUS to perform the action.
3.2.2 Parameter
Parameters are user inputs that ConnectUS requires to perform certain commands.
Example: n/NAME
In this case, NAME is the information field that you wish to input. The n/ prefix must be used for ConnectUS to recognise that you intend on adding a NAME to a contact.
- The list of information fields, prefixes and their details can be found in Information Fields & Prefixes.
- You can also find a condensed summary of these information fields in the Prefix Summary.
![]() Note:
Note:
As of now, using non-English languages (e.g. Chinese, French) as information fields are not yet supported. Be sure to look out for it in a future iteration!
3.3 Command Format
To use ConnectUS, type the command along with its parameters, if required. You can leave the parameters empty if it is optional (i.e. if it is wrapped in square brackets like this: help [COMMAND]).
- The detailed list of commands and their command formats can be found in Features.
- You can also find a condensed summary of these commands in the Command Summary.
![]() Notes about the command format:
Notes about the command format:
-
Words in
UPPER_CASEare the information fields (referred to as parameters) to be supplied by the user.
e.g. inadd n/NAME,NAMEis a parameter which can be used asadd n/John Doe. -
Items in square brackets are optional.
e.gn/NAME [b/BIRTHDAY]can be used asn/John Doe b/14/02/2000or asn/John Doe. -
Items with
… after them can be used multiple times including zero times.
e.g.[mod/MODULE]…can be used asmod/CS2103T(i.e. 1 time),mod/CS2103T mod/CS2107(i.e. 2 times) etc. -
Information fields can be in any order.
e.g. if the command specifiesn/NAME p/PHONE,p/PHONE n/NAMEis also acceptable. -
If a parameter is expected only once in the command, but you specify it multiple times, only the last occurrence of the parameter will be taken.
e.g. if you specifyp/12341234 p/56785678, onlyp/56785678will be taken. -
Extraneous parameter for commands that do not take in parameters (such as
list,exitandclear) will be ignored.
e.g. if the command specifieslist 123, it will be interpreted aslist. -
Commands are case-sensitive!
e.g. if you specifyADD n/JamesoraDd n/Jamesinstead ofadd n/James, ConnectUS will not register it as a valid command.
3.4 How to Use the CLI
To use the Command Line Interface (CLI), you can type a command in the Command Box and press Enter to execute it. For example, typing help and pressing Enter will open the help window.
To familiarise yourself with ConnectUS, let’s try out the add command ! The add command allows you to add a new contact into the Contact List.
Format: add n/NAME [p/PHONE] [a/ADDRESS] [e/EMAIL] [tg/TELEGRAM] [ig/INSTAGRAM] [wa/WHATSAPP] [b/BIRTHDAY] [mod/MODULE]… [cca/CCA[#CCA_POSITION]]… [maj/MAJOR]… [r/REMARK]…
What does Format mean?
The first word of every command allows ConnectUS to distinguish different commands.
-
addtells ConnectUS that this command is to add a new contact - Prefixes such as
n/andp/are delimiters that allow ConnectUS to distinguish different parameters from the input that you supply - Information fields such as
NAMEandPHONEshow you what you should place in each portion of the command.
Notice how there are square brackets [] surrounding certain parameters like in [p/PHONE]. This indicates that the parameter is optional, i.e. a contact can exist even if it does not have this field.
Other parameters that end with … like in [mod/MODULE]… indicates that this parameter can be used multiple times.
Let’s test this out!
Suppose you have a friend whose nickname is Lineup Larry. His phone number is 91234567, and he stays on campus in UTown Residences. His Telegram username is lineuplarry, takes the modules CS2103T and CS2101, and is in the Art Club.
NAME: Lineup Larry
PHONE: 91234567
ADDRESS: UTown Residences
TELEGRAM: lineuplarry
MODULE: CS2103T, CS2101
CCA: Art Club
The command you would enter into the command box would be:
add n/Lineup Larry p/91234567 a/UTown Residences tg/lineuplarry mod/CS2103T mod/CS2101 cca/Art Club
Go ahead and hit enter once you’ve entered the command. If you have a new contact added in the Contact List as follows:

Congratulations! You have successfully added your first contact!
There are many other features in ConnectUS. Do refer to the Features below for details on each feature and command!
4. Features
ConnectUS has many features to assist you in your contact management needs. The exhaustive list of supported commands are as follows:
- 4.1 Viewing help:
help - 4.2 Listing all contacts:
list - 4.3 Clearing all entries:
clear - 4.4 Adding a contact:
add - 4.5 Editing a contact:
edit - 4.6 Adding additional tags to a contact:
add-t - 4.7 Deleting tags from a contact:
delete-t - 4.8 Deleting a contact:
delete - 4.9 Searching for contact information:
search - 4.10 Opening a social media platform:
open - 4.11 Open a social media platform with prefilled message:
chat - 4.12 View upcoming birthdays:
upcoming-b - 4.13 Exiting the program:
exit - 4.14 Saving the data
- 4.15 Editing the data file
4.1 Viewing help: help
Format: help [COMMAND]
Opens up the help window, or returns the usage instructions of a specific command.
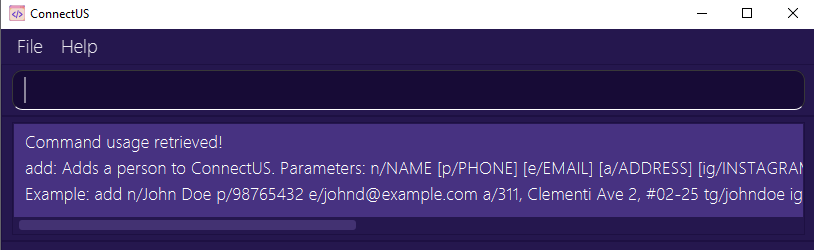
If you are lost while using ConnectUS, simply use the help command! Using the help command alone will show a message explaining how to access this User Guide.
If you want to know the usage instructions of a specific command, simply use help [COMMAND], where [COMMAND] is the command that you need help with. There will be feedback from the command result feedback box if the command is successfully retrieved.
Examples: help, help add, help list
4.2 Listing all contacts: list
Format: list
Shows a list of all contact in the ConnectUS app.
Use list when you need to view a list of all the contacts in your ConnectUS. The list command can be used directly without any additional parameters.
4.3 Clearing all entries: clear
Format: clear
Clears all contacts from the ConnectUS app.
ConnectUS comes with a set of default contacts. If you want to remove all default contacts, or you want to restart your ConnectUS contact list, you can use the clear command without any additional parameters.
![]() Caution:
Caution:
Once the contact data in ConnectUS is cleared, it cannot be retrieved. Do proceed with caution!
Clear Example:
Input in Command Box: clear
Result: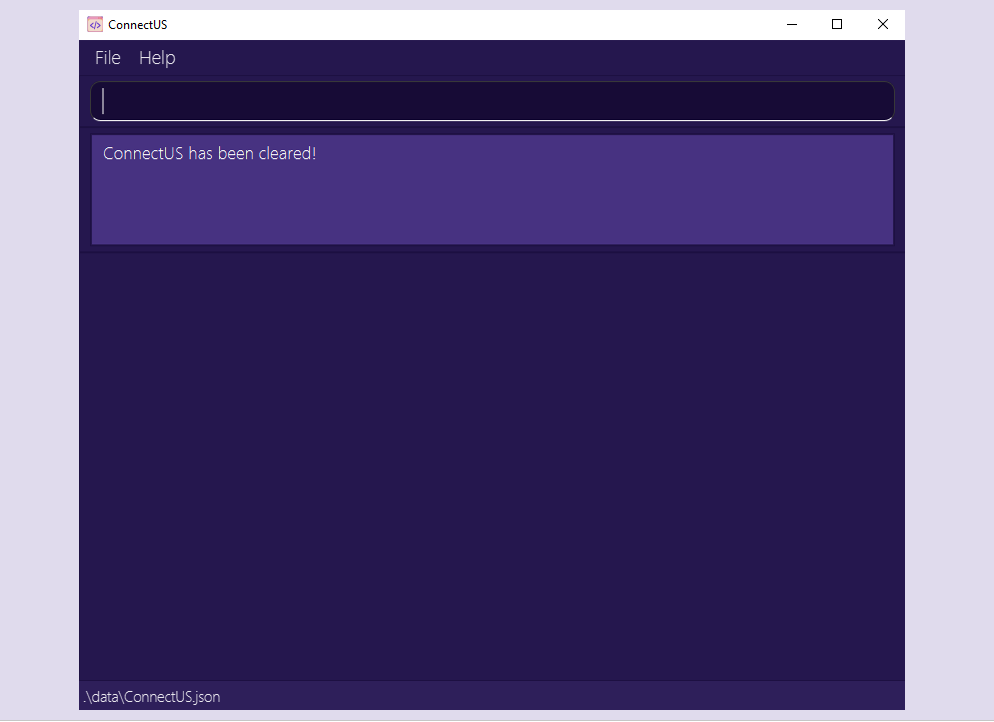
4.4 Adding a contact: add
Format: add n/NAME [p/PHONE] [a/ADDRESS] [e/EMAIL] [tg/TELEGRAM] [ig/INSTAGRAM] [wa/WHATSAPP] [b/BIRTHDAY] [mod/MODULE]… [cca/CCA[#CCA_POSITION]]… [maj/MAJOR]… [r/REMARK]…
Adds a contact to the ConnectUS app.
You can add a contact using the add command followed by the parameters (as shown in the format above). While the NAME is mandatory, the rest of the fields (i.e. ADDRESS, TELEGRAM, MODULE etc.) are optional.
![]() Tip:
Tip:
-
A contact can have any number of module, CCA, and remark tags (including 0)!
-
A contact can have at most 2 major tags. If you input more than 2 majors, only the last 2 occurrences will be taken as parameters!
Add Example 1:
Input in Command Box: add n/James
Result: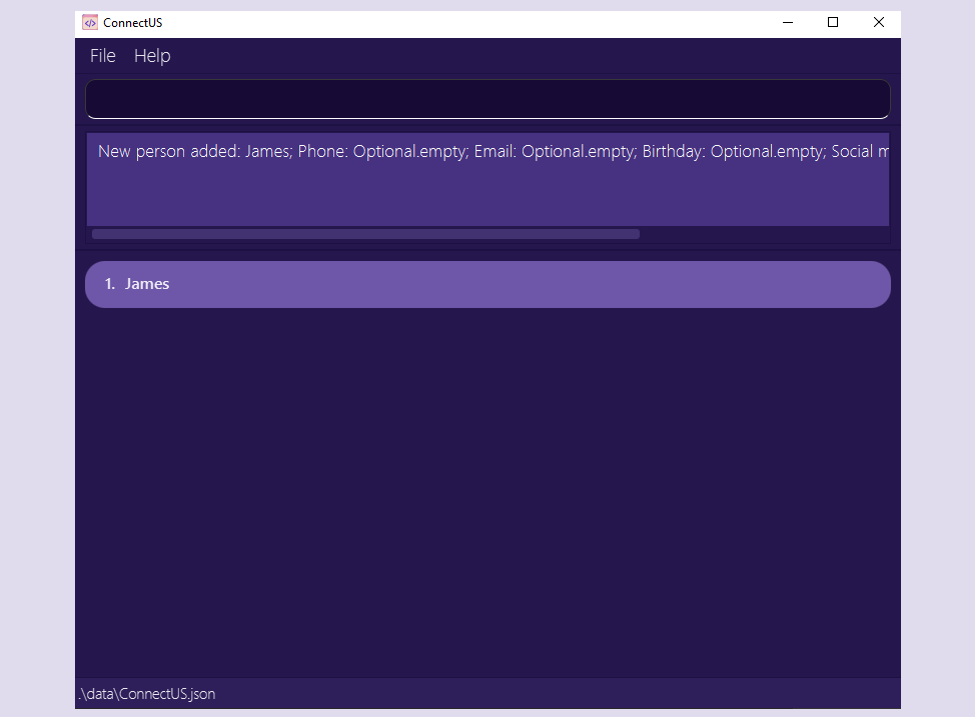
Add Example 2:
Input in Command Box: add n/James e/james@example.com ig/itsjameshere tg/itsjameshere mod/CS2103T mod/CS2101 cca/NUS Hackers r/Year 2 b/01/01/2000
Result: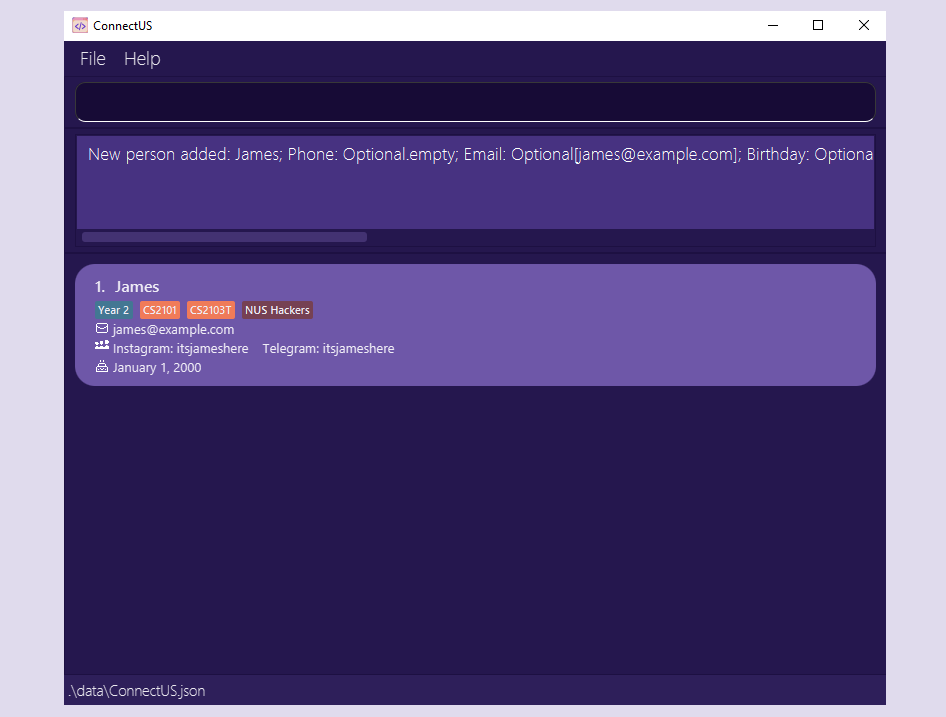
Please refer to Information Fields & Prefixes for details on how to use each parameter prefix.
![]() Tip:
Tip:
ConnectUS helps you to detect duplicate contacts by checking the existing contacts for the exact same name (case-sensitive) whenever you add a new contact.
4.5 Editing a contact: edit
Format: edit INDEX [n/NAME] [p/PHONE] [a/ADDRESS] [e/EMAIL] [ig/INSTAGRAM] [tg/TELEGRAM] [wa/WHATSAPP] [b/BIRTHDAY]
Edits an existing contact in the ConnectUS app.
If you accidentally added the wrong information when adding a contact, or if you want to update your contacts’ information, you use the edit command.
![]() Tip:
Tip:
If you want to edit a contact’s tags, refer to these guides on Adding Additional Tags or Deleting Existing Tags instead!
The edit command:
- Edits the contact at the specified
INDEX. The index refers to the index number shown in the displayed contact list. - The index must be a positive integer e.g. 1, 2, 3, …
- At least one of the optional fields must be provided (e.g.
n/NAME,tg/TELEGRAM). - Existing values will be updated to the input values.
Edit Example:
Input in Command Box: edit 1 p/12345678 e/james@example.com
Before: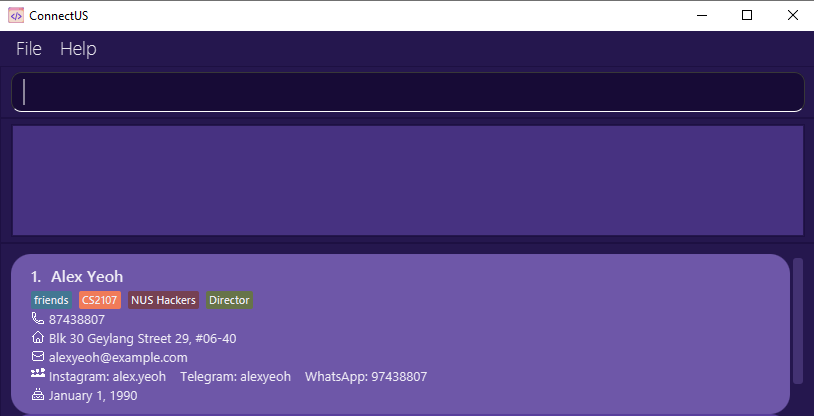
After:
Please refer to Information Fields & Prefixes for details on how to use each parameter prefix.
![]() Tip:
Tip:
ConnectUS helps you to detect duplicate contacts by checking the existing contacts for the exact same name (case-sensitive) whenever you edit an existing contact.
![]() Note:
Note:
As of now, removing a contact’s information field is not yet supported. Be sure to look out for it in a future iteration!
4.6 Adding additional tags to a contact: add-t
Format: add-t PERSON_INDEX [r/REMARK] [mod/MODULE] [cca/CCA[#CCA_POSITION]] [maj/MAJOR]
Adds a tag to an existing contact.
If you want to add a new tag to a contact, you can use the add-t command.
The add-t command:
- Adds a tag to the contact at the specified
PERSON_INDEX. ThePERSON_INDEXrefers to the index number shown in the displayed contact list. - The index must be a positive integer e.g. 1, 2, 3, …
- At least one of the optional fields must be provided (e.g.
r/REMARK_NAME,mod/MODULE_CODE). - A new tag will be created and assigned to the person specified at the
PERSON_INDEX. - No duplicate tags are allowed. This means that if there is a pre-existing tag type with a certain tag name, the tag will not show up in the UI.
- e.g. If there is an existing remark tag for
classmatesforPERSON_INDEX1, doingadd-t 1 r/classmatesWILL NOT add an additional remark tag.
- e.g. If there is an existing remark tag for
Add Tag Example:
Input in Command Box: add-t 1 r/friends mod/CS2103T
Before: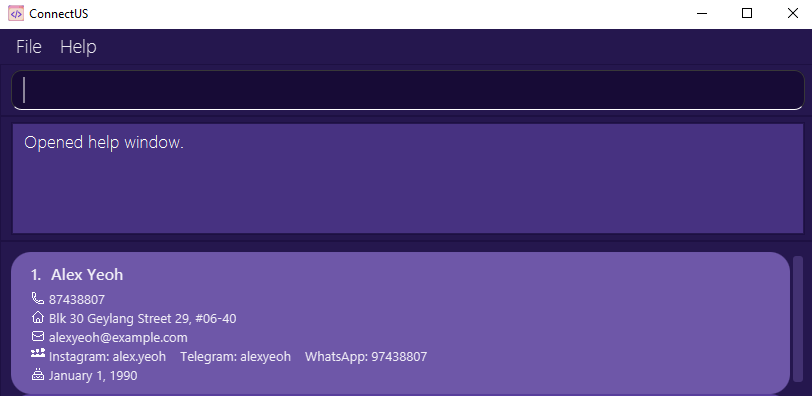
After: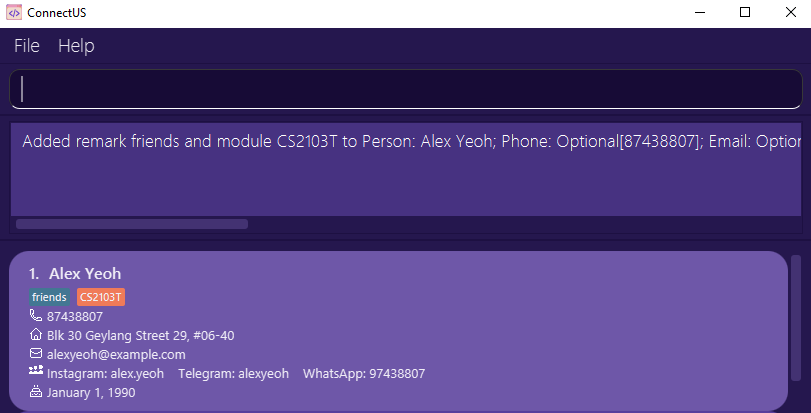
4.7 Deleting tags from a contact: delete-t
Format: delete-t PERSON_INDEX [r/REMARK_INDEX] [mod/MODULE_INDEX] [cca/CCA_INDEX] [maj/MAJOR_INDEX]
Deletes an existing tag from an existing contact.
If you want to delete an existing tag from a contact, you can use the delete-t command.
The delete-t command:
- Deletes a tag from the contact at the specified
PERSON_INDEX. ThePERSON_INDEXrefers to the index number shown in the displayed contact list. - The
REMARK_INDEX,MODULE_INDEX,CCA_INDEXandMAJOR_INDEXrefer to the index of the tag shown in the respective tag types, from left to right, starting from index 1.
For example, the Module tags are indexed from 1 to 3 as follows:

- All indexes (i.e.
PERSON_INDEX,REMARK_INDEX,MODULE_INDEX,CCA_INDEX,MAJOR_INDEX) must be a positive integer e.g. 1, 2, 3, … - At least one of the optional fields must be provided (i.e.
r/REMARK_INDEX,mod/MODULE_INDEX,cca/CCA_INDEX,maj/MAJOR_INDEX). - The specified tag will be deleted from the contact specified at the
PERSON_INDEX.
![]() Note:
Note:
As of now, tags can only be deleted one at a time. If there is more than one occurrence of a parameter, only the last one will be taken.
Delete Tag Example:
Input in Command Box: delete-t 1 mod/2
Before:
After: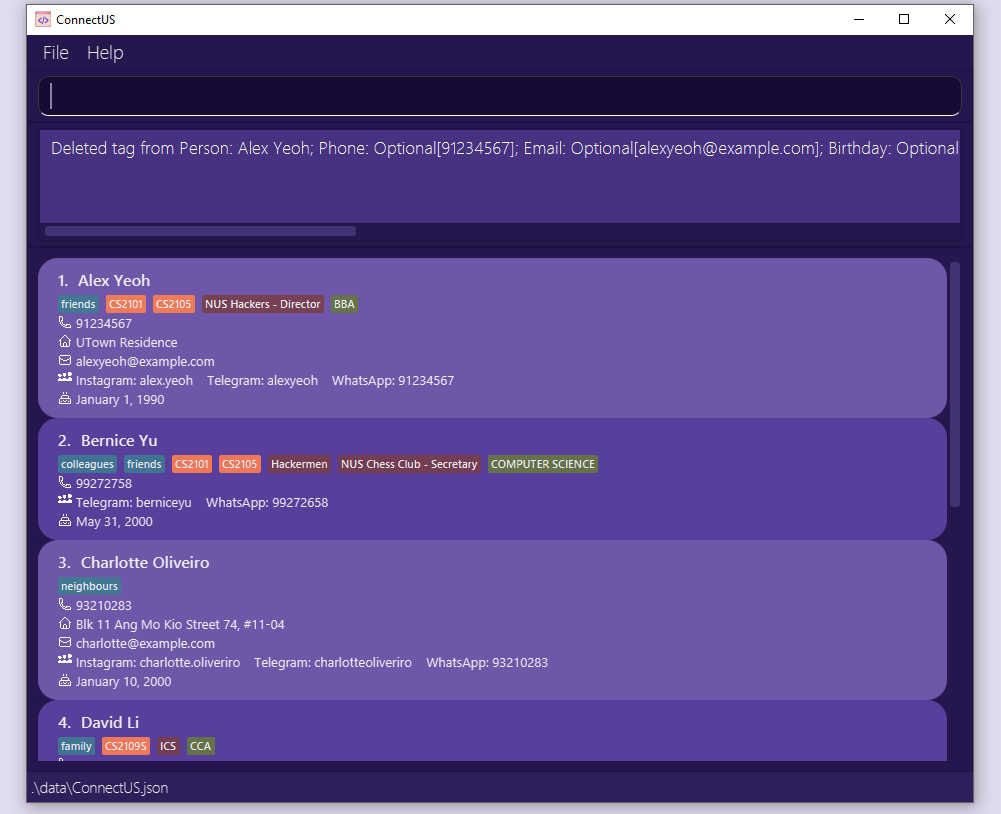
4.8 Deleting a contact: delete
Format: delete PERSON_INDEX
Deletes the specified contact from the ConnectUS app.
If you wish to remove a contact, use the delete command.
The delete command:
- Deletes the contact at the specified
PERSON_INDEX. - The
PERSON_INDEXrefers to the index number shown in the displayed contact list. - The index must be a positive integer e.g. 1, 2, 3, …
Delete Example 1:
list followed by delete 2 deletes the 2nd contact in the ConnectUS app.
Before: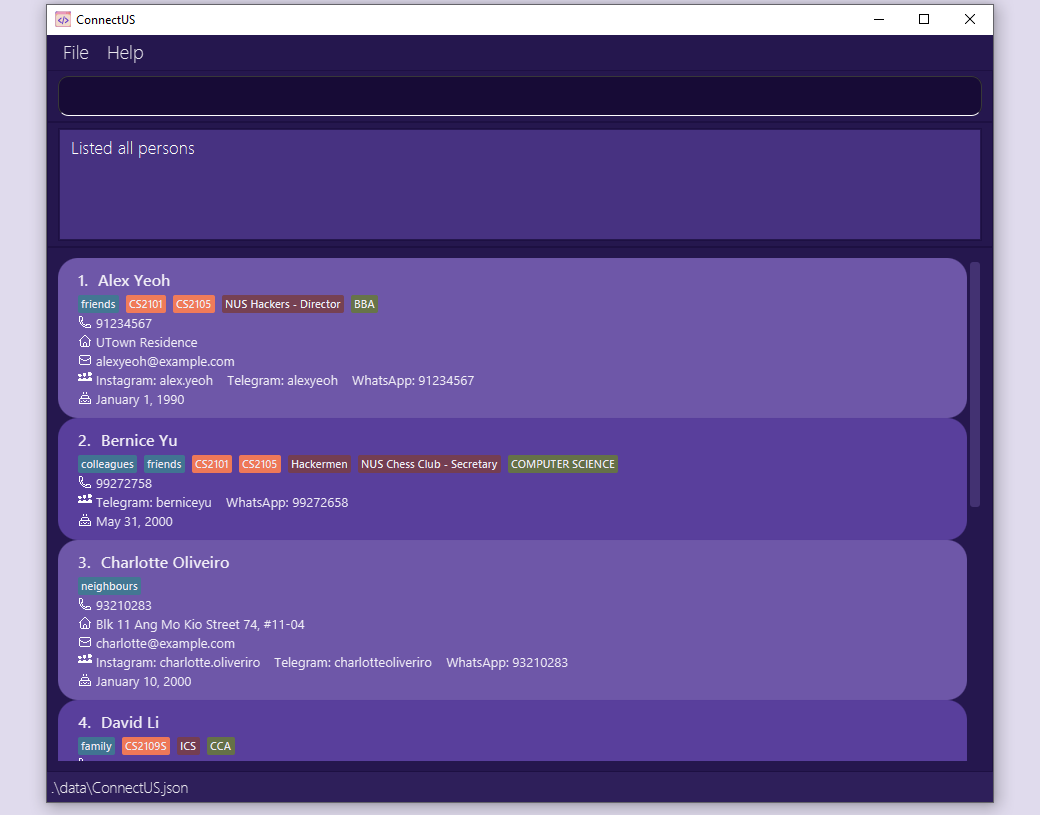
After: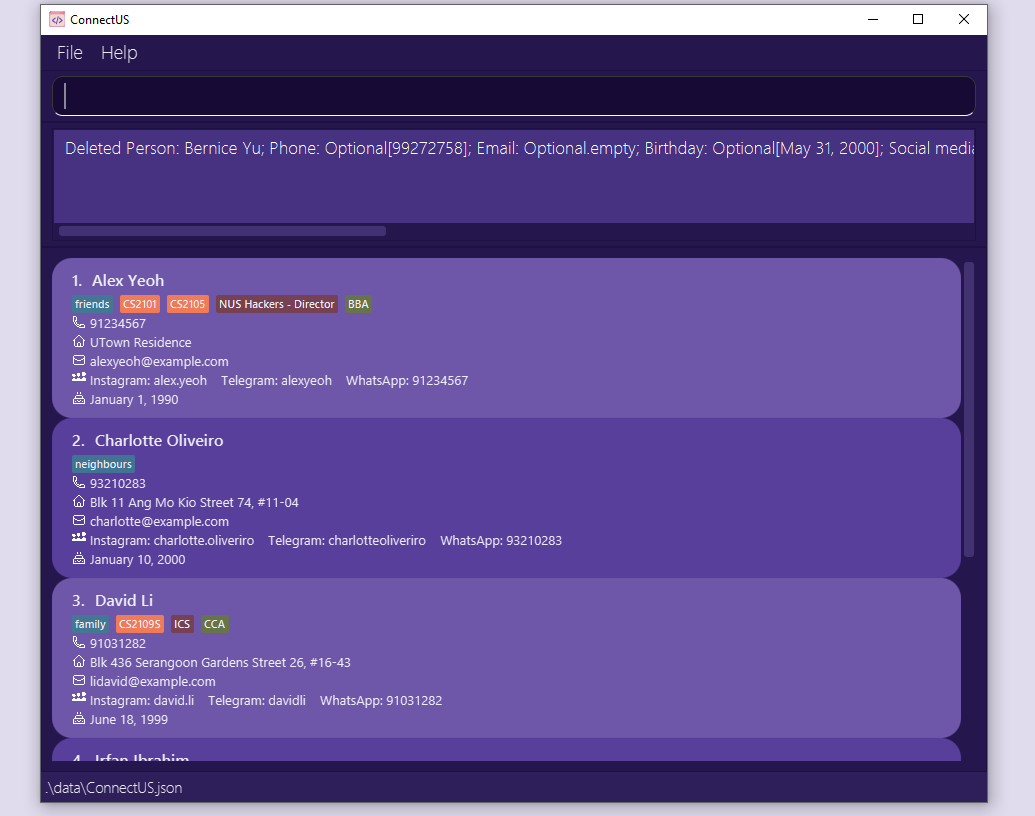
Delete Example 2:
search Alex followed by delete 1 deletes the 1st contact in the results of the search command.
Before: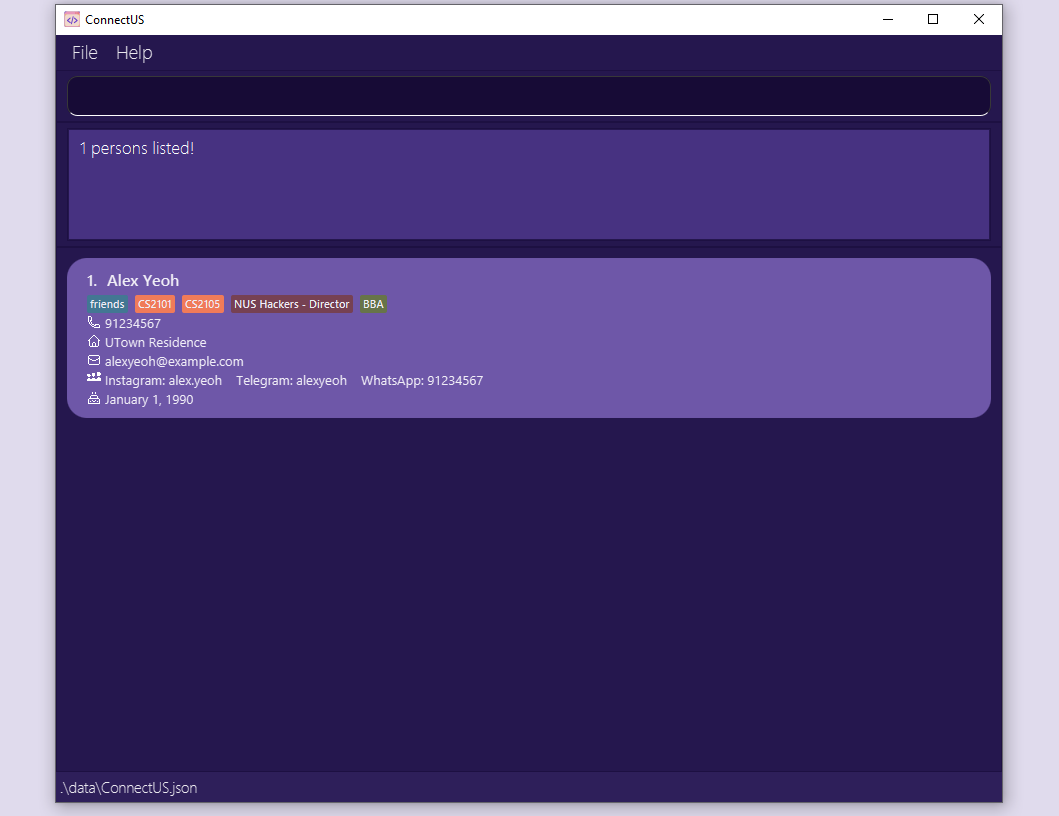
After: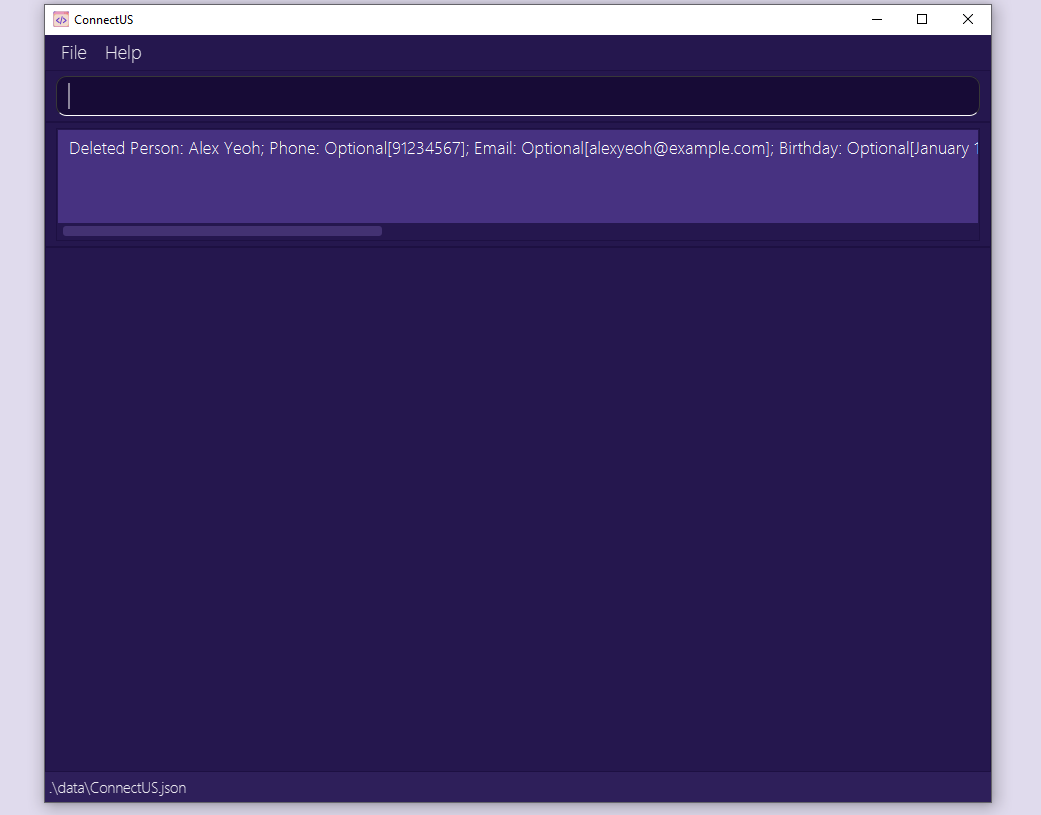
![]() Tip:
Tip:
To retrieve your contacts after a search, type list in the Command Box and hit enter!
4.9 Searching for contact information: search
Format: search [KEYWORD]... [n/NAME_KEYWORD] [p/PHONE_KEYWORD] [e/EMAIL_KEYWORD] [b/BIRTHDAY_KEYWORD] [ig/INSTAGRAM_KEYWORD] [wa/WHATSAPP_KEYWORD] [tg/TELEGRAM_KEYWORD] [r/REMARK_KEYWORD]... [mod/MODULE_KEYWORD]... [cca/CCA_KEYWORD#CCA_POSITION_KEYWORD]... [maj/MAJOR_KEYWORD]...
For keywords without a specified field, finds all contacts whose information from any field contains the given keywords.
For keywords in a specified field, finds all contacts whose field contains given keyword.
There are 2 methods which you can use concurrently to search for a contact.
Method 1:
Using search KEYWORD will return a list of all the contacts that match the KEYWORD in ANY of their information fields.
For example, if you have 2 contacts, one with the name January, and another with a birthday in January, search January will return both those contacts.
Method 2:
Using search with prefixes (e.g. search n/NAME_KEYWORD) will return a list of contacts with that match the information field given by the prefix.
From the earlier example, if you have 2 contacts, one with the name January, and another with a birthday in January, search n/January will only return the contact whose name is January.
Additional Examples:
-
search januaryreturns all contacts whose information fields contain the keywordjanuary. -
search alex mayreturns all contacts whose information fields contain the keywordsalexandmay. -
search may blk n\alexreturns all contacts whose name contains the keywordalexand which contain the keywordsmayandblkin any of the information fields. -
search n\lex yreturns all contacts whose name contains the keywordlex y -
search n\alex b\mayreturns all contacts whose name contains the keywordalexand whose birthday contains the keywordmay -
search mod\cs mod\mareturns all contacts who have at least one module which contains the keywordcsand at least one module which contain the keywordma -
search ig\al cca\chessreturns all contacts whose instagram handle contains the keywordaland who has at least one cca with the wordchessin it -
search cca\#presidentreturns all contacts who have a position that contains the keywordpresidentin at least one cca
![]() Tip:
Tip:
-
The keywords are case-insensitive! This means that
search january,search JANUARYandsearch jAnUaRywill all return the contacts whose information fields contain the keywordjanuary. -
Only unspecified keywords treat space as a separator. This means
search yu alexwill search for a contact that contains bothyuandalexin the information, butsearch n/yu alexwill search for a contact that contains the stringyu alexin its name. -
If you have 2 contacts, one with the name January, and another with a birthday in January,
search n/Januarywill return ONLY the contact whose name is January.
Search Example 1:
Input in Command Box: search cs
Result: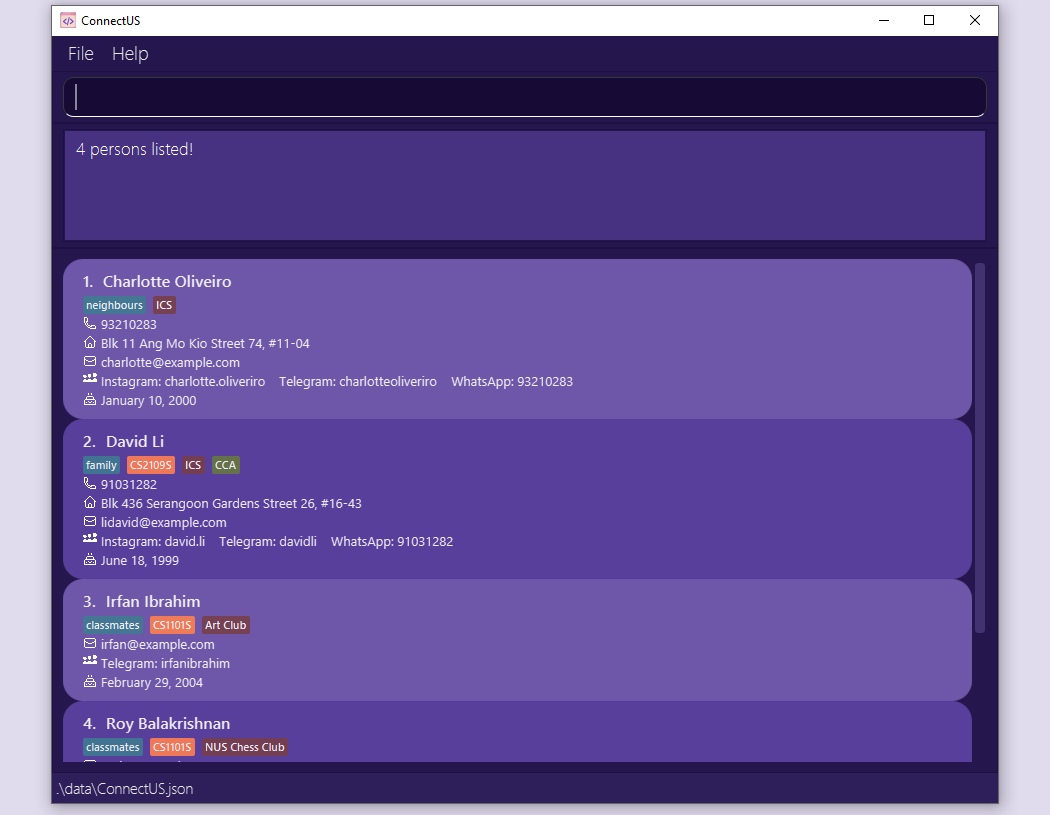
Search Example 2:
Input in Command Box: search mod/cs
Result: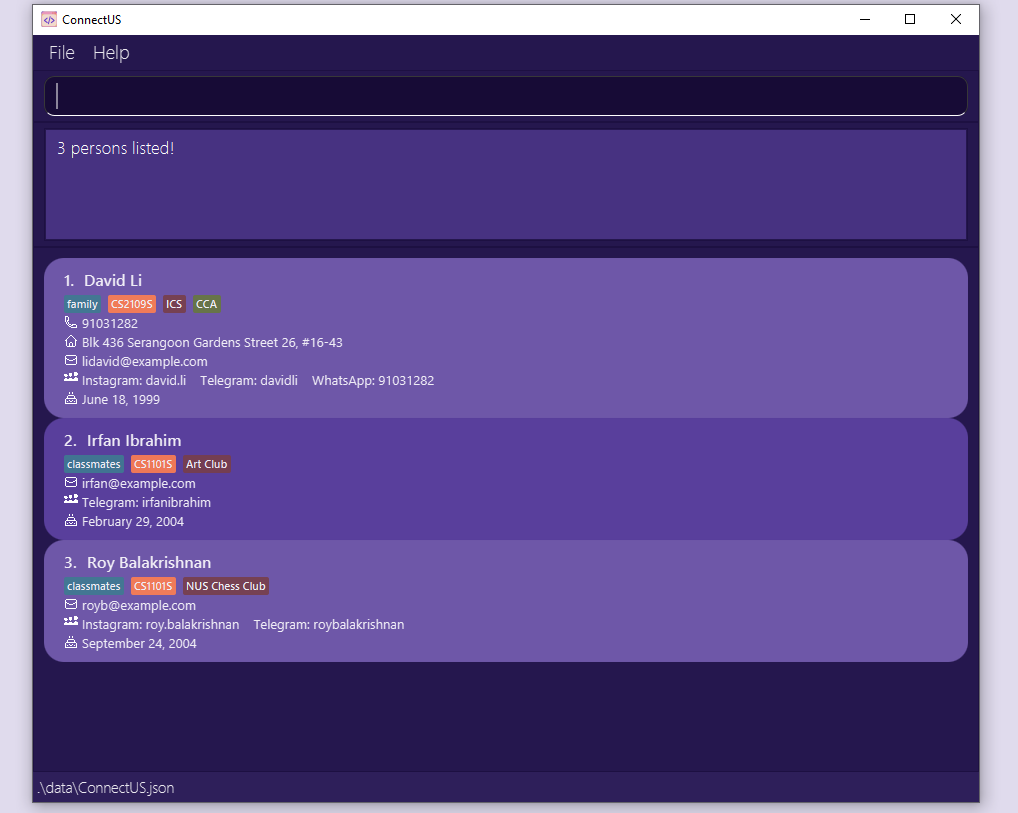
![]() Tip:
Tip:
To retrieve your contacts after a search, type list in the Command Box and hit enter!
Please refer to Information Fields & Prefixes for details on how to use each parameter prefix.
4.10 Opening a social media platform: open
Format: open PERSON_INDEX [tg/] [wa/] [ig/]
Opens the respective social media platform of an existing contact.
You can directly open supported social media platforms (i.e. Instagram, Telegram, WhatsApp) from the CLI.
For WhatsApp, if a handle stored is an 8-digit phone number, it will be assumed as a Singaporean number and the 65 country code will be automatically filled.
![]() Tip:
Tip:
You’ll need to download the desktop applications for Telegram and WhatsApp respectively if you want to use these features!
Open Example:
Input in Command Box: open 2 tg/
Result: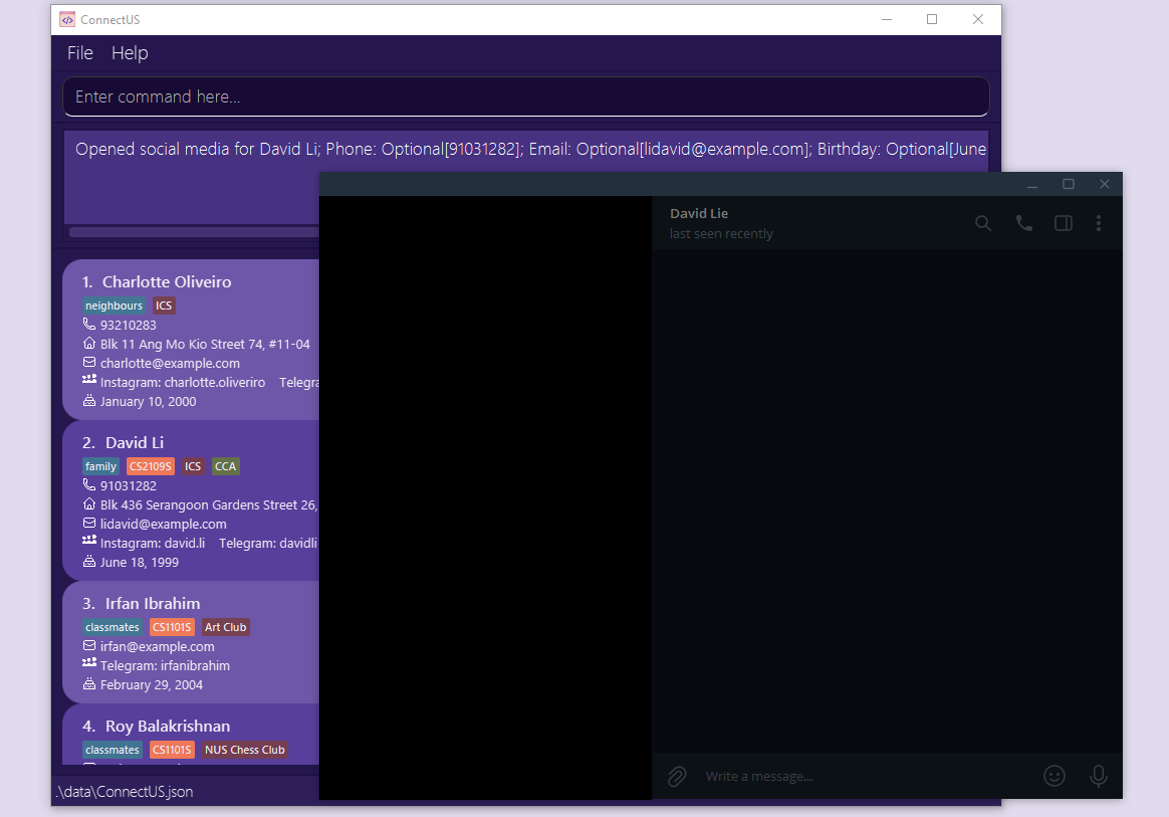
4.11 Opening a social media platform with prefilled message: chat
Format: chat PERSON_INDEX wa/ m/MESSAGE
Opens the respective social media platform of an existing contact with specified message prefilled.
Due to platform constraints, only WhatsApp is supported.
Similar to open, if a WhatsApp handle stored is an 8-digit phone number, it will be assumed as a Singaporean number and the 65 country code will be automatically filled.
All your existing messages in the text field will be replaced.
![]() Tip:
Tip:
You’ll need to download the desktop application for WhatsApp if you want to use this feature!
Note that WhatsApp might not be responsive enough to prefill the message for you. In this case, you can execute the command once again.
Chat Example:
Input in Command Box: chat 1 wa/ m/hello world!
Result: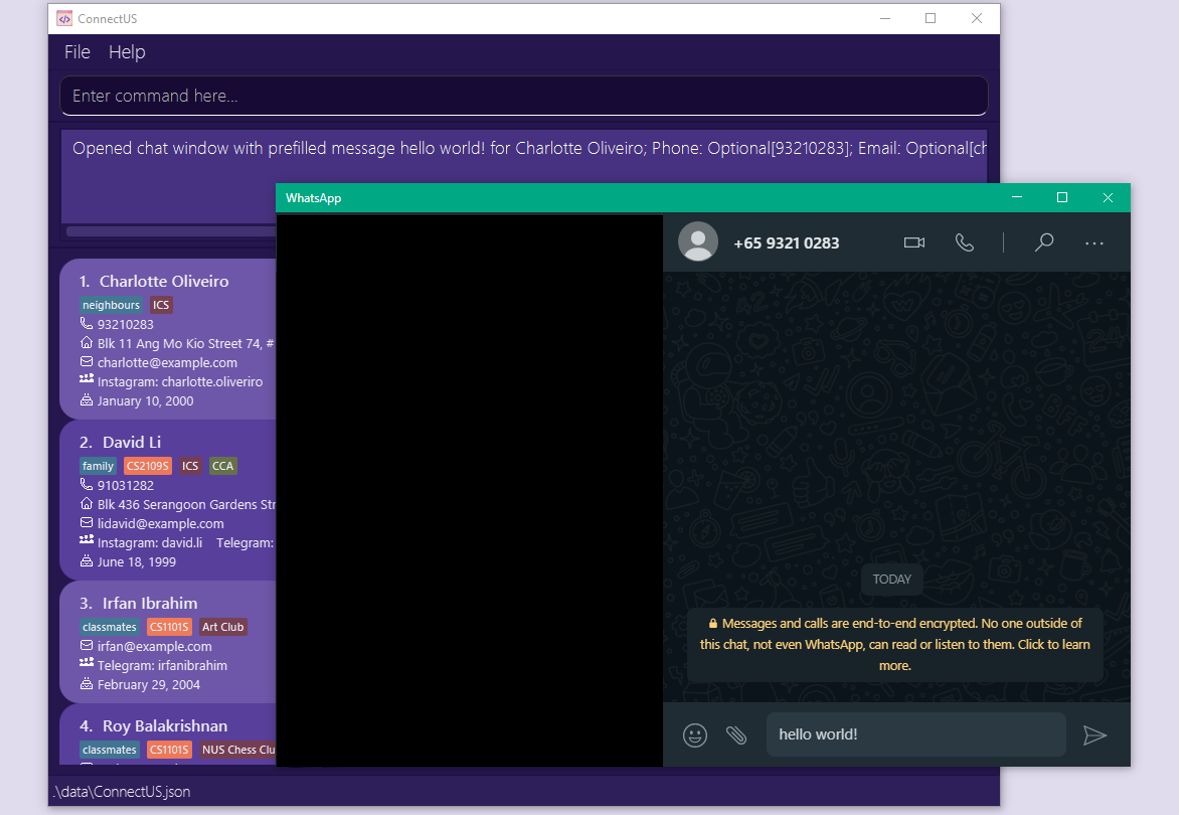
4.12 View upcoming birthdays: upcoming-b
Format: upcoming-b
Shows all contacts who have upcoming birthdays within the next 60 days.
Never forget a birthday again! With upcoming-b, you can check which of your friends have their birthdays in the next 60 days (approx. 2 months).
Upcoming Birthday Example:
Input in Command Box: upcoming-b
Result: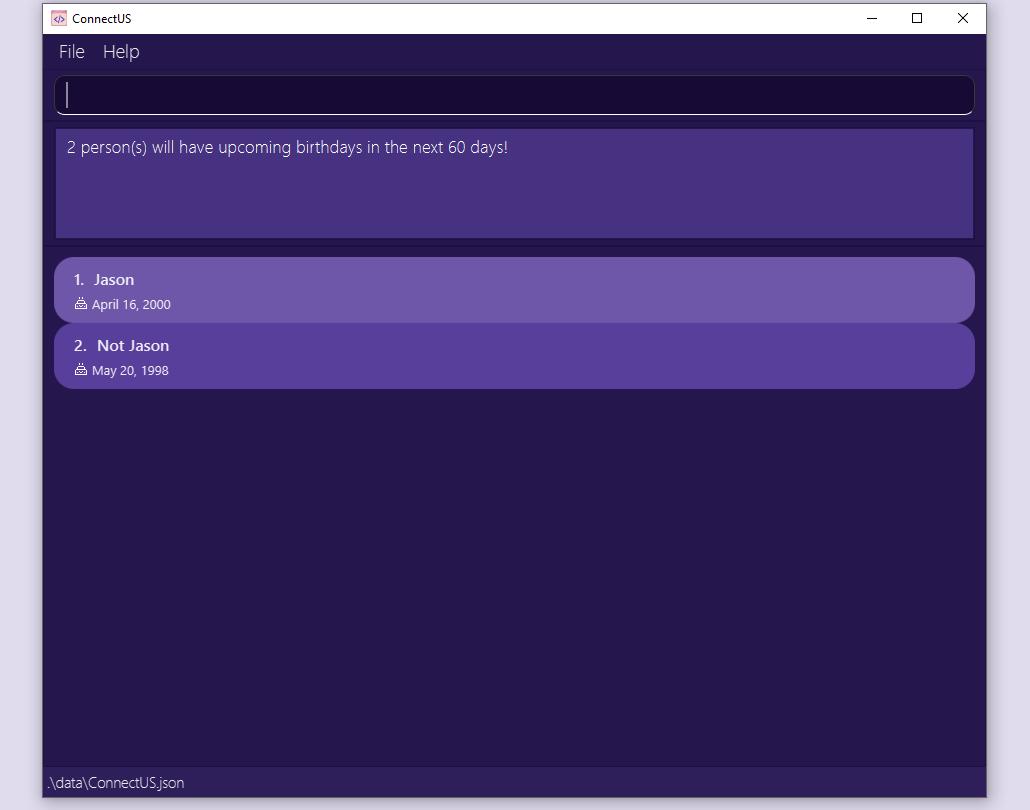
4.13 Exiting the program: exit
Format: exit
Exits the program.
When you are done with your contact management needs, you can exit ConnectUS with the exit command.
4.14 Saving the data
You won’t ever need to worry about losing your contacts. ConnectUS automatically saves your data in the hard disk after any command that changes the data. There is no need to save manually.
4.15 Editing the data file
If you are an advanced user, you are welcome to update data directly by editing the data file.
ConnectUS data is saved as a JSON file [JAR file location]/data/ConnectUS.json.
![]() Caution:
Caution:
If your changes to the data file makes its format invalid, ConnectUS will discard all data and start with an empty data file at the next run. Do remember to keep a backup of your data before attempting any changes in this manner!
5. Information Fields & Prefixes
ConnectUS uses prefixes to distinguish between the different types of information fields you supply. The exhaustive list of information fields supported and their respective prefixes are as follows:
- 5.1 Name:
n/ - 5.2 Phone:
p/ - 5.3 Email:
e/ - 5.4 Address:
a/ - 5.5 Instagram:
ig/ - 5.6 Telegram:
tg/ - 5.7 WhatsApp:
wa/ - 5.8 Birthday:
b/ - 5.9 Tags
5.1 Name: n/
Name refers to a contact’s name.
- Name is a compulsory field, i.e. a contact cannot exist if it does not have a name.
- The prefix for a name is
n/. - Names should only contain alphanumeric characters and spaces.
5.2 Phone: p/
Phone refers to a contact’s phone number.
- Phone is an optional field, i.e. a contact can exist even if it does not have a phone number.
- The prefix for a phone is
p/. - Phone numbers should only contain numeric characters. This also means no spaces are allowed!
- Phone numbers should be at least 3 digits long.
5.3 Email: e/
Email refers to a contact’s email address.
- Email is an optional field, i.e. a contact can exist even if it does not have an email.
- The prefix for an email is
e/. - Emails should be of the format local-part@domain and adhere to the following constraints:
- The local-part should only contain alphanumeric characters and these special characters:
+_.-. The local-part may not start or end with any special characters. - This is followed by a ‘@’ and then a domain name. The domain name is made up of domain labels separated by periods.
The domain name must:
- end with a domain label at least 2 characters long
- have each domain label start and end with alphanumeric characters
- have each domain label consist of alphanumeric characters, separated only by hyphens, if any.
- The local-part should only contain alphanumeric characters and these special characters:
5.4 Address: a/
Address refers to a contact’s home address.
- Address is an optional field, i.e. a contact can exist even if it does not have an address.
- The prefix for an address is
a/. - Addresses can take any values, including special characters.
5.5 Instagram: ig/
Instagram refers to a contact’s Instagram username.
- Instagram is an optional field, i.e. a contact can exist even if it does not have an Instagram.
- The prefix for an Instagram username is
ig/. - Instagram usernames should be of the format
john.123.doeand adhere to the following constraints:- The username should only contain alphanumeric characters and the special character:
.. - The dots
.must not be consecutive or at the end. - The username should contain at most 30 characters.
- The username should only contain alphanumeric characters and the special character:
5.6 Telegram: tg/
Telegram refers to a contact’s Telegram username.
- Telegram is an optional field, i.e. a contact can exist even if it does not have a Telegram.
- The prefix for a Telegram username is
tg/. - Telegram usernames should be of the format
johndoeand adhere to the following constraints:- The username should only contain alphanumeric characters and the special character
_. - The username should contain at least 5 characters.
- The username should only contain alphanumeric characters and the special character
5.7 WhatsApp: wa/
WhatsApp refers to a contact’s WhatsApp phone number.
- WhatsApp is an optional field, i.e. a contact can exist even if it does not have a WhatsApp.
- The prefix for adding a WhatsApp is
wa/. - A WhatsApp’s user identifier is a phone number, which should adhere to the following constraints:
- Phone numbers should only contain numeric characters. This also means no spaces are allowed!
- Phone numbers should be at least 3 digits long.
5.8 Birthday: b/
Birthday refers to a contact’s birthday date.
- Birthday is an optional field, i.e. a contact can exist even if it does not have a birthday.
- The prefix for a birthday is
b/. - Birthdays should be of the format DD/MM/YYYY:
-
01/01/2000would correspond to January 1st, 2000 -
16/05/1990would correspond to May 16th, 1990.
-
5.9 Tags
Tags are used to assign additional information to a contact.
There are four kinds of tags in ConnectUS. They are Module Tags, CCA Tags, Major Tags, and Remark Tags.
5.9.1 Module Tags: mod/
Module tags refer to modules that you can assign to a contact to keep track of what modules that contact takes.
- Module is an optional field, i.e. a contact can exist even if it does not have a module.
- The prefix for a module is
mod/. - Module names should be alphanumeric, and cannot contain spaces.
- A contact can have any number of modules assigned to it.
5.9.2 CCA Tags: cca/
CCA tags refer to CCAs that you can assign to a contact to record keep track of CCAs that contact is in.
- CCA is an optional field, i.e. a contact can exist even if it does not have a CCA.
- The prefix for a CCA is
cca/. - CCA names should be alphanumeric, and can contain spaces.
- A contact can have any number of CCAs assigned to it.
If you wish to assign a CCA Position to a contact, you can do so with the CCA prefix as well!
- Format:
cca/CCA[#CCA_POSITION] - CCA_POSITION is optional, however if you enter # after CCA you are expected to enter a CCA_NAME.
- Example: If you have a contact who is the President of the Chess Club, you can use the field
cca/Chess Club#Presidentto assign that CCA tag to them. - Example: If you have a contact who is a member of the Arts Club, but you do not know their position, you can use the field
cca/Arts Clubto assign just CCA.
5.9.3 Major Tags: maj/
Major tags refer to Majors that you can assign to a contact to keep track of the majors that the contact is taking.
- Major is an optional field, i.e. a contact can exist even if it does not have a Major.
- The prefix for a major is
maj/. - Major names should be alphanumeric, and can contain spaces.
- A contact can have a maximum of 2 majors assigned to it.
- If more than 2 majors are assigned during add command, the last 2 majors are taken.
- If total number of majors after using add-t exceeds 2, the command is not accepted.
5.9.4 Remark Tags: r/
Remark tags refer to any additional remarks you would like to assign to a contact to keep track of any information you deem relevant and important.
- Remark is an optional field, i.e. a contact can exist even if it does not have a remark.
- The prefix for a remark is
r/. - Remark names should be alphanumeric, and can contain spaces.
- A contact can have any number of remarks assigned to it.
Why do we need remark tags if we already have other kinds of tags?
- Remarks are used for assigning other information to a contact, e.g. their Year of Study, Faculty, Company etc.
- If a tag you want to add to a contact does not exist, you can use the remark tag.
- The difference in tag colours in the UI can help you differentiate between the different kinds of tags.
![]() Note:
Note:
As of now, using non-English languages (e.g. Chinese, French) as information fields are not yet supported. Be sure to look out for it in a future iteration!
6. FAQ
Q: How do I transfer my data to another Computer?
A: Install the app in the other computer and overwrite the empty data file it creates with the file that contains the data of your previous ConnectUS home folder.
Q: Why do we need remark tags if we already have other kinds of tags?
A: Remarks are used for assigning other information to a contact, e.g. their Year of Study, Faculty, Company etc. If a tag you want to add to a contact does not exist, you can use the remark tag. The difference in tag colours in the UI can help you differentiate between the different kinds of tags.
Q: When adding information fields in non-English languages, why is there no response from the application?
A: As of now, using non-English languages (e.g. Chinese, French) as information fields are not yet supported. Be sure to look out for it in a future iteration!
Q: Why can’t I remove an information field after I add it with edit?
A: As of now, removing a contact’s information field is not yet supported. Be sure to look out for it in a future iteration!
7. Command Summary
| Command | Format | Example |
|---|---|---|
| Add a Contact | add n/NAME [p/PHONE] [a/ADDRESS] [e/EMAIL] [tg/TELEGRAM] [ig/INSTAGRAM] [wa/WHATSAPP] [b/BIRTHDAY] [mod/MODULE]… [cca/CCA#CCA_POSITION]… [major/MAJOR]… |
add n/James p/12345678 e/james@example.com tg/itsjameshere b/14/02/2000 mod/CS2103T |
| Add Tag | add-t PERSON_INDEX [r/REMARK] [mod/MODULE] [cca/CCA[#CCA_POSITION]] [maj/major] |
add-t 1 r/friends mod/CS2103T cca/NUS Hackers#President |
| Chat with Contact | chat PERSON_INDEX wa/ m/MESSAGE |
chat 1 wa/ m/hello world! |
| Clear Data | clear |
|
| Delete a Contact | delete PERSON_INDEX |
delete 3 |
| Delete Tag | delete-t PERSON_INDEX [r/REMARK_INDEX] [mod/MODULE_INDEX] [cca/CCA_INDEX] [maj/MAJOR_INDEX] |
delete-t 1 mod/1 |
| Edit a Contact | edit PERSON_INDEX [n/NAME] [p/PHONE] [a/ADDRESS] [e/EMAIL] [tg/TELEGRAM] [ig/INSTAGRAM] [wa/WHATSAPP] [b/BIRTHDAY] |
edit 1 p/12345678 e/james@example.com tg/itsjameshere |
| Help | help [COMMAND] |
help, help add
|
| List All Contacts | list |
|
| Open Social Media | open PERSON_INDEX [tg/] [wa/] [ig/] |
open 1 tg/ |
| Search | search [KEYWORD]... [n/NAME_KEYWORD] [p/PHONE_KEYWORD] [e/EMAIL_KEYWORD] [b/BIRTHDAY_KEYWORD] [ig/INSTAGRAM_KEYWORD] [wa/WHATSAPP_KEYWORD] [tg/TELEGRAM_KEYWORD] [r/REMARK_KEYWORD]... [mod/MODULE_KEYWORD]... [cca/CCA_KEYWORD]... [maj/MAJOR_KEYWORD]... |
search alex january,search n/lex Y mod/CS2103T mod/CS2101
|
| Upcoming Birthdays | upcoming-b |
|
| Exit | exit |
8. Prefix Summary
| Information Field | Prefix | Example |
|---|---|---|
| Address | a/ |
a/Blk 456, Den Road, #01-355 |
| Birthday | b/ |
b/01/01/2000 |
| CCA Tag | cca/ |
cca/NUS Hackers, cca/Chess Club#President
|
e/ |
e/johndoe@example.com |
|
ig/ |
ig/john.doe |
|
| Major Tag | maj/ |
maj/Computer Engineering |
| Module Tag | mod/ |
mod/CS2103T |
| Name | n/ |
n/John Doe |
| Phone | p/ |
p/91234567 |
| Remark Tag | r/ |
r/School of Computing |
| Telegram | tg/ |
tg/johndoe |
wa/ |
wa/91234567 |
9. Glossary
A
Alphanumeric: English alphabet letters and numbers only.
C
CCA: Co-curricular activities that students participate in.
Command Line Interface (CLI): A text-based user interface used to run programs.
Command: Commands are actions that you want to perform using ConnectUS. Most commands will require user inputs, otherwise known as parameters, for ConnectUS to perform the action.
ConnectUS.jar:
.jaris short for Java ARchive. A file format that contains the executable Java application for ConnectUS.
F
Format: In this User Guide, the format of a command is the correct input usage of a command.
G
GitHub: A web-based version control and collaboration platform for software developers.
Graphical User Interface (GUI): A form of user interface that allows users to interact with programs through graphical icons and audio indicators.
J
Java
11: A feature release of the Java SE platform, used to run ConnectUS. The download link for this release can be found here.JavaFX: A Java library used for creating and delivering desktop applications.
JSON: Short for JavaScript Object Notation. A standard text-based format for representing structured data based on JavaScript object syntax. Basically, it stores your data.
M
Major: Majors are the main programmes that students take at the National University of Singapore.
Module: Modules are courses that students take at the National University of Singapore.
N
Numeric: Numbers only.
NUS: Short for the National University of Singapore.
P
Parameter: Parameters are user inputs that ConnectUS requires to perform certain commands.
S
School of Computing: Also known as SoC. A computing school in the National University of Singapore.
Special Characters: Characters that are not alphabetic or numeric.
U
UTown Residence: Also known as UTR. On-campus accommodation for students at the National University of Singapore.